Obsidian Context Map for Jira Support
Setup, support, privacy, terms, and security information for Obsidian Context Map for Jira.
View the Project on GitHub tndud2505-ops/jira-obsidian-support
Obsidian Context Map for Jira setup and use
Obsidian Context Map for Jira turns one Jira project’s work-item hierarchy and relationships into an interactive map. This guide shows where to open the app, what appears on each part of the screen, what every control does, which connection types are supported, and how to keep a large project readable.
All screenshots were captured from an installed Marketplace development build using a live Jira test site. The Jira work items are test data; the controls and results are from the running app.
1. Access and requirements
Before you start
You need:
- a Jira Cloud site;
- the app installed by a Jira administrator;
- an active Marketplace trial or subscription; and
- Jira permission to view the project and work items you want to map.
The app uses the current user’s Jira permissions. It cannot reveal a project or work item that the user cannot open in Jira.
Open the app
- Open Jira on the site where the app is installed.
- Open a Jira project.
- Select Jira Obsidian in the project navigation.
- If it is not visible, open the project’s More or more tabs menu and select Jira Obsidian.
- Depending on the Jira navigation version and administrator configuration, a site-wide Jira Obsidian entry may also appear under Apps.
- Wait until the project name, node count, and map appear.
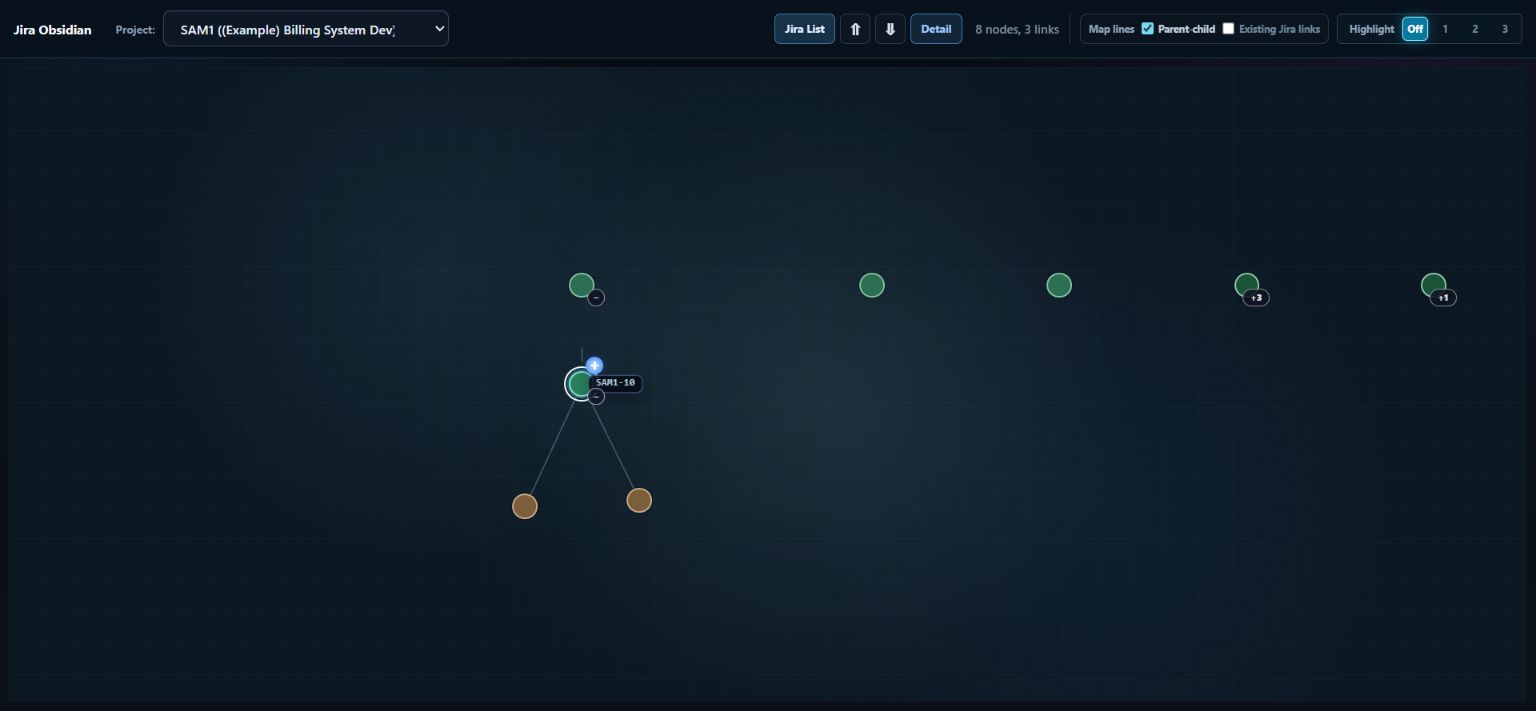
What appears: the selected project, the map toolbar, eight visible work items, three hierarchy lines, and a focused Task. The test project contains 12 issues in total, but unopened branches stay out of the working view.
2. Screen tour
The app is divided into four working areas.
| Area | What appears there | Main use |
|---|---|---|
| Top toolbar | Project selector, panel buttons, counts, line toggles, and highlight depth | Change the project or control the current view. |
| Jira List | A collapsible parent-child tree with issue keys, titles, types, and relationship counts | Find an issue and control which hierarchy branches are visible. |
| Context Map | Issue nodes, hierarchy lines, Jira-created links, app-created relationships, and connection handles | Explore context and create or inspect relationships. |
| Detail panel | Selected issue key, title, Jira fields, description, comments, and issue actions | Read the issue without leaving the map. |
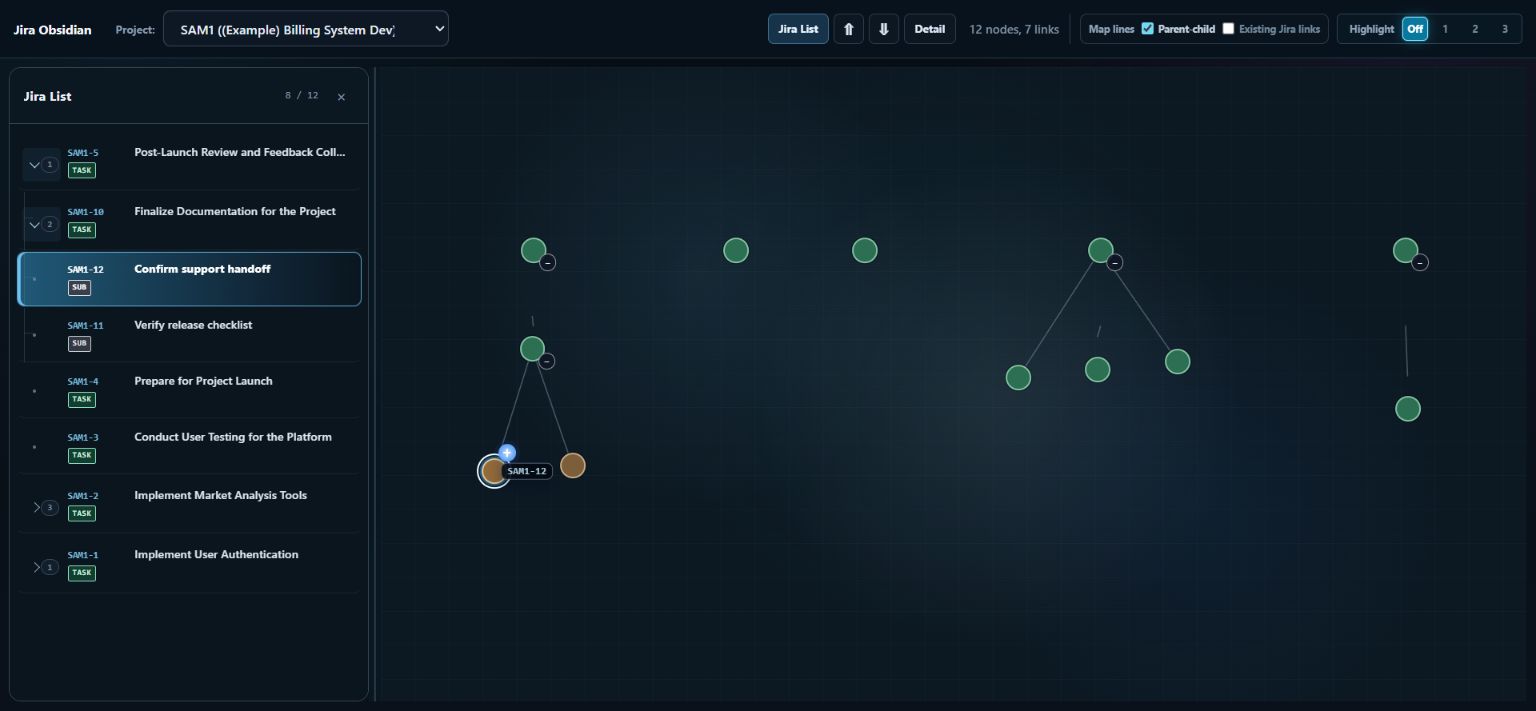
Observed result: the SAM1-5 Epic branch is open, SAM1-10 appears beneath it as a Task, and SAM1-11 and SAM1-12 appear beneath the Task as Subtasks. Eight of the project’s 12 issues are shown in the Jira List, while unrelated branches remain collapsed.
3. Buttons and controls
Project and navigation
| Control | Location | What it does |
|---|---|---|
| Project | Top-left selector | Loads another Jira project that the current user can access. One project is mapped at a time. |
| Jira List | Top toolbar | Opens or closes the issue hierarchy panel. Selecting a row focuses the same issue on the map. |
| ⇑ Collapse all | Beside Jira List | Hides all expanded descendant branches and reduces the visible map. |
| ⇓ Expand all | Beside Jira List | Expands all available hierarchy branches. Large projects may become crowded. |
| Detail | Top toolbar | Opens or closes the selected issue’s read-only detail panel. |
| Node and link count | Top toolbar | Reports the nodes and lines currently visible on the canvas. |
Map visibility and focus
| Control | Location | What it does |
|---|---|---|
| Parent-child | Map lines group | Shows or hides Jira Epic, Task, and Subtask hierarchy lines. |
| Existing Jira links | Map lines group | Shows or hides native Jira issue links. These links are read-only in the app. |
| Highlight Off | Top-right group | Shows all visible nodes at normal emphasis. |
| Highlight 1 | Top-right group | Emphasizes the selected issue and its immediate connections. |
| Highlight 2 / 3 | Top-right group | Emphasizes a wider two-step or three-step neighborhood. |
| Node | Context Map | Selects and focuses that Jira work item. |
| +1 / +3 branch badge | Parent node | Expands hidden descendants for that branch. The number is the hidden descendant count. |
| − branch badge | Expanded parent node | Collapses that branch. |
| Blue + | Focused node | Starts an app-created relationship from that source issue. |
Mouse and panel actions
| Action | Result |
|---|---|
| Drag empty canvas space | Pans the map. |
| Mouse wheel or trackpad gesture | Zooms the map. |
| Select a Jira List row or map node | Focuses the same issue in both places. |
| Double-click a parent node | Expands or collapses its descendants. |
| Select a relationship line or relationship chip | Opens the relationship inspector. |
| Select Open in Jira in the Detail panel | Opens the full Jira issue page. |
| Select × on a side panel | Closes the panel and returns space to the map. |
4. Keep a large project readable
The Context Map loads project work items the current user can access. When a project has many issues, narrow the visible context before opening both side panels.
- Open Jira List.
- Select ⇑ Collapse all.
- Expand only the branch you need with its +number badge.
- Select the issue you are investigating.
- Use Highlight 1 for immediate neighbors, or 2 / 3 when more context is needed.
- Temporarily hide Parent-child or Existing Jira links if one line type is not relevant.
- Close Jira List or Detail when you need more canvas width.
Highlighting is a visual focus aid, not a Jira data filter. Collapsing branches changes which hierarchy nodes are visible. The current screen does not provide a text-search or JQL-filter control.
5. Connection categories
The map combines Jira-owned structure with relationships stored by the app.
A. Jira hierarchy
| Connection | Meaning | Direction | Managed in |
|---|---|---|---|
| Parent-child | Jira Epic, Task, and Subtask hierarchy | Parent → child | Jira. The app only displays or hides it. |
Parent-child lines appear automatically when the hierarchy exists in Jira. Change a work item’s parent on the Jira issue page.
B. Existing Jira issue links
| Connection | Meaning | Direction | Managed in |
|---|---|---|---|
| Existing Jira links | Native Jira links such as blocks, is blocked by, duplicates, or relates to | Defined by the Jira link type | Jira. They are read-only in the app. |
Enable Existing Jira links to show these lines. The app does not rename, edit, or delete Jira-owned links.
C. App-created relationships
| Connection button | Meaning | Direction | Example |
|---|---|---|---|
| Prerequisite | The source must be resolved before the target can proceed. | Source → target | SAM1-12 → SAM1-4: SAM1-12 is a prerequisite for SAM1-4. |
| Relates to | The two work items are associated without dependency or proof. | Non-directional | SAM1-12 ↔ SAM1-4: the Subtask and Epic are related. |
| Confirms | The source provides verification or evidence for the target. | Source → target | SAM1-12 → SAM1-4: SAM1-12 confirms SAM1-4. The saved inspector describes this as verifies. |
App-created relationships are stored in Atlassian Forge hosted storage. Both endpoints must be different work items in the same selected project, and the current user must be able to access both.
6. Create a relationship
- Select the issue that should be the source.
- Select the blue + on that source node.
- Select the target node. Other visible nodes show blue target handles while this mode is active.
- Choose Prerequisite, Relates to, or Confirms from the menu between the two nodes.
- The relationship saves immediately. The toolbar link count and relationship count update after the save finishes.
You can also drag from the source connection handle to the target and then choose the relationship type.
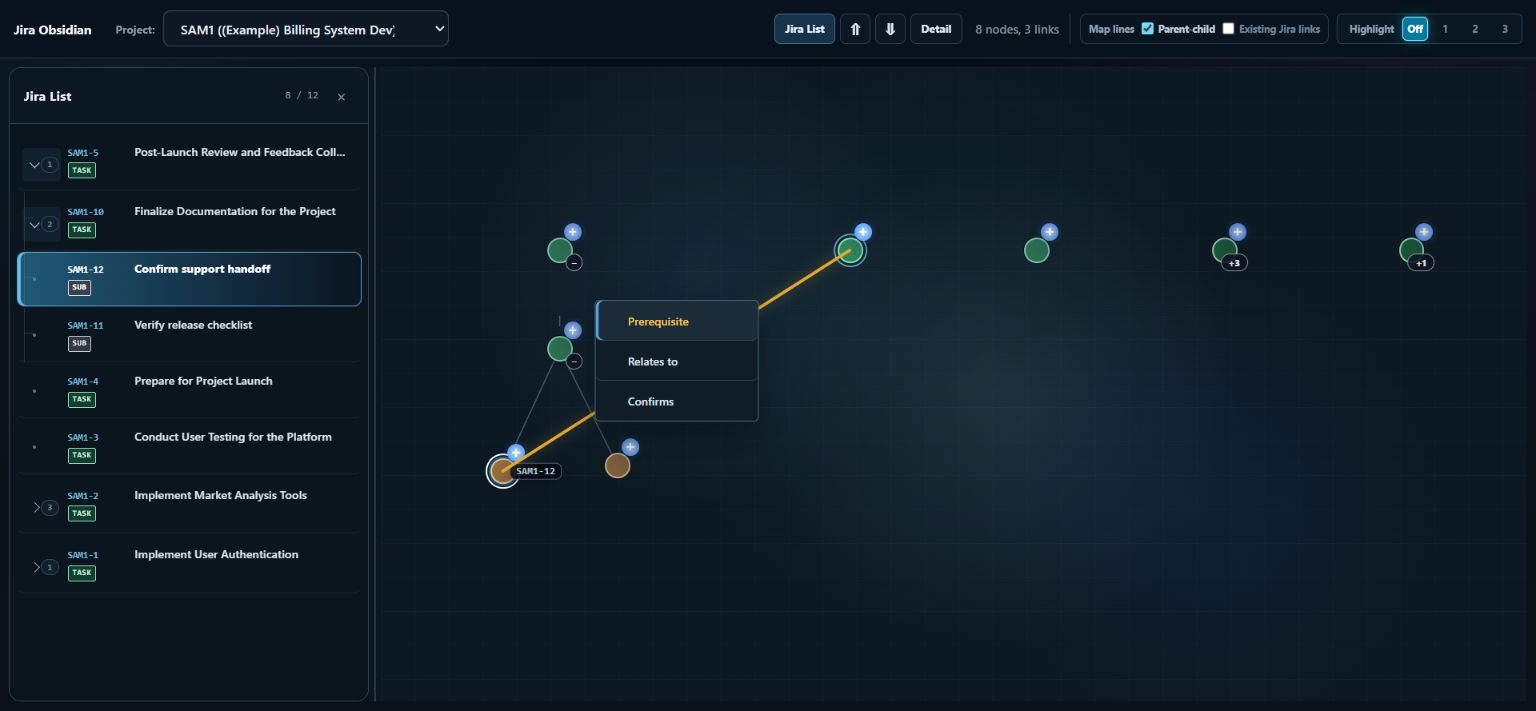
What appears: SAM1-12 is the Subtask source, SAM1-4 is the Epic target, and the exact supported relationship buttons appear at the connection midpoint.
7. Inspect or delete a relationship
- Select a relationship line, or select a relationship chip under Focused relationships.
- Read the origin, source issue, relationship type, and target issue in the inspector.
- App-created relationships show origin Obsidian and a Delete link button.
- Confirm both endpoints before selecting Delete link. Deletion is immediate and has no undo action.
- Jira-created links do not show Delete link. Open the issue in Jira to manage them.
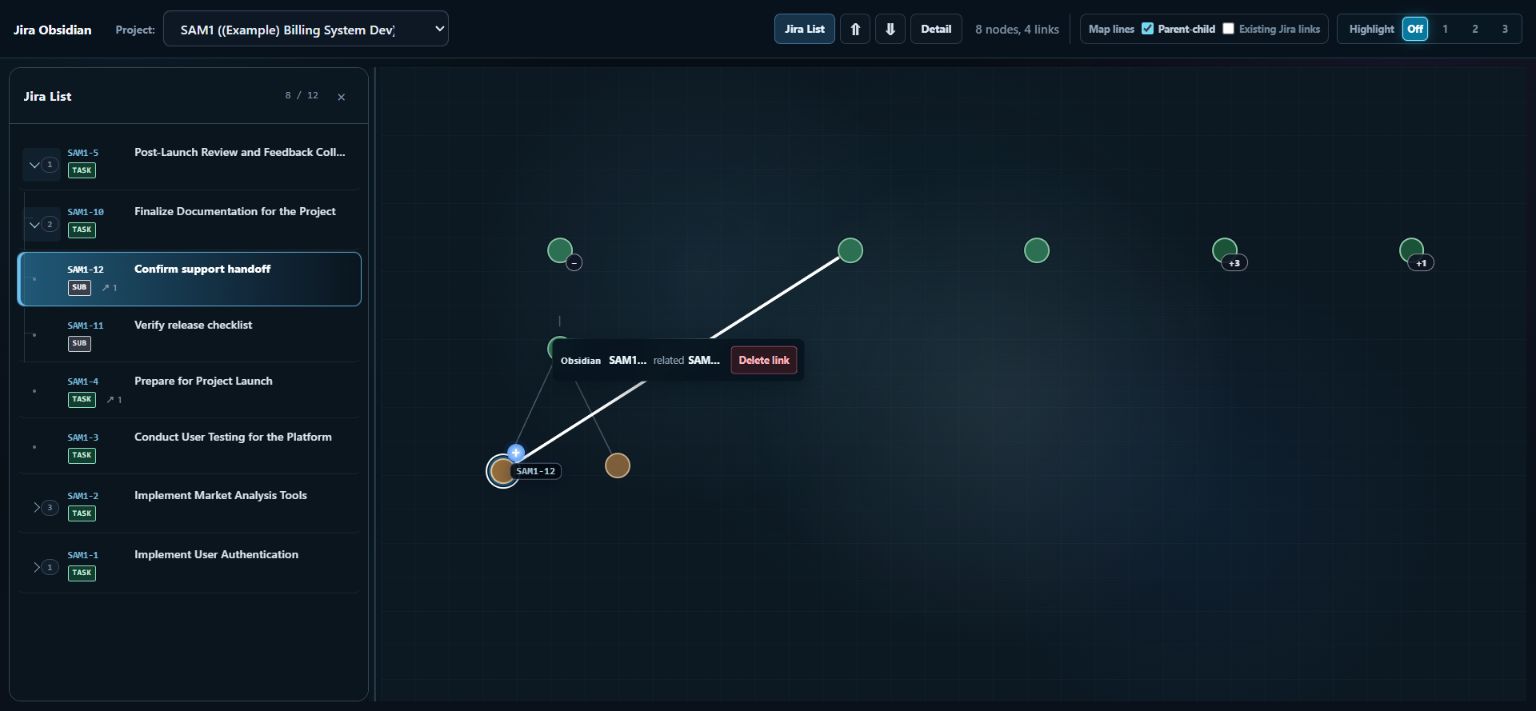
Observed result: a temporary SAM1-12 related SAM1-4 relationship increased the visible line count from three to four. The inspector identified the relationship as Obsidian-owned and offered Delete link. After capture, the temporary relationship was deleted and the working view returned to eight nodes and three lines.
8. Read an issue without leaving the map
- Select a Jira List row or map node.
- Select Detail.
- The right panel shows the issue key and title, collapsible Jira details, description, and comments.
- Use the external-link action to Open in Jira when you need to edit fields, status, assignee, description, or comments.
- Select × to close the panel.
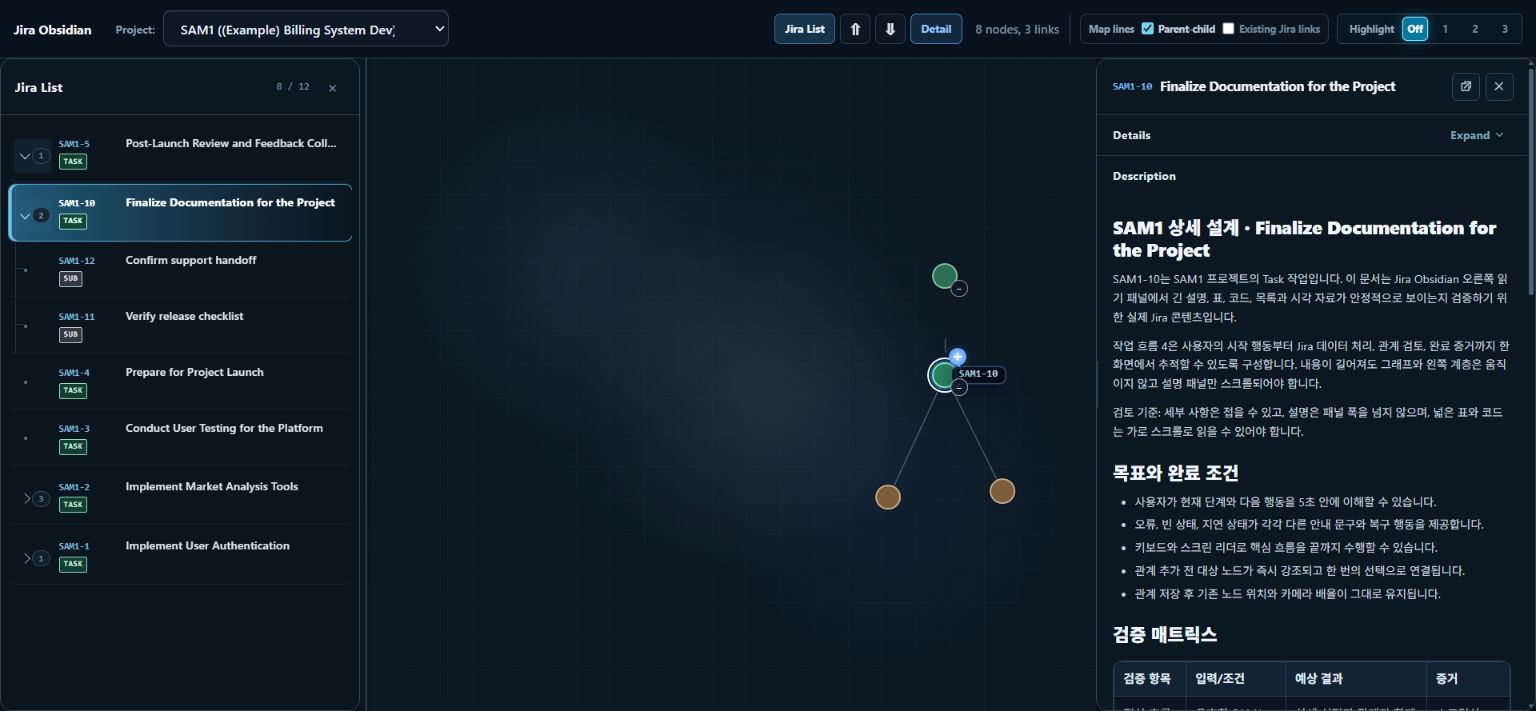
What appears: the SAM1-10 Task selected beneath its Epic, both Subtasks directly below it, the matching node in the center, and Jira-provided issue content in the read-only Detail panel on the right. Jira content can appear in the Jira user’s configured language.
9. Supported features and current limits
Supported
- Jira Cloud projects available to the current user;
- Epic, Task, and Subtask hierarchy visualization;
- optional display of existing Jira issue links;
- app-created Prerequisite, Relates to, and Confirms relationships;
- Jira List and map selection synchronization;
- read-only issue details, descriptions, and comments;
- pan, zoom, branch expansion, branch collapse, and connection-depth highlighting;
- direct navigation to the full Jira issue; and
- Atlassian Forge hosted execution and relationship storage.
Current limits
- one selected Jira project is mapped at a time;
- app-created relationships cannot connect work items from different projects;
- Jira fields, status, assignee, description, and comments are not edited in the app;
- Jira-owned issue links cannot be deleted in the app;
- relationship deletion has no undo action;
- there is no text-search or JQL-filter control on the current Context Map screen; and
- the app does not bypass Jira permissions or send Jira content to an external AI service.
10. Troubleshooting
The app is missing from Jira
- Confirm that a Jira administrator installed it on the current Jira Cloud site.
- Check the project navigation, its More menu, and Jira’s Apps navigation.
- Ask the administrator to confirm that the Marketplace trial or subscription is active.
The app shows “Subscription required”
Ask a Jira administrator to start a Marketplace trial or activate the subscription, then reopen the app.
The map does not load, or Jira returns 401, 403, or a fetch error
- Confirm that you are signed in to the correct Jira Cloud site.
- Confirm that you can open the selected project and affected work item directly in Jira.
- Reload Jira, reopen the app, and select the project again.
- If the error continues, contact support with the app version, approximate time, browser, safe reproduction steps, and exact error text. Do not send passwords, tokens, or confidential Jira content.
A project or work item is missing
- Select the correct project.
- Confirm that the current Jira user can browse the project and open the work item directly in Jira.
- Ask a Jira administrator to review project permissions if the access result is unexpected.
A relationship cannot be created
- Use two different work items in the selected project.
- Confirm that you can open both work items in Jira.
- Wait for the current save to finish before starting another relationship.
- Reload the map before retrying if the prior save returned an error.
A relationship cannot be removed
Only app-created relationships can be removed in the Context Map. Existing Jira links must be managed in Jira. You also need access to both relationship endpoints.
Get support
Start at the Support page. Email support is available at support@allrightsoftware.com without a GitHub account. Public GitHub Issues require a GitHub account and sign-in; when signed out, GitHub may show Issue creation is restricted.
For suspected vulnerabilities, follow the private reporting instructions in the Security Policy.
See also the Privacy Policy and Terms of Service.